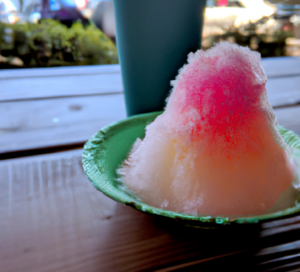
You probably already know how to make ice — put water in a container and stick it in the freezer.
But making ice for shaved ice and snow cones is a little different from making ice cubes. There are a couple things that can go wrong — so I wanted to pass along what I’ve learned through trial and error.
Advantages Of Freezing Your Own Ice
So why even make ice? Can’t you just buy it from a convenience store or ice supplier?
Yes, you can absolutely do this and if you’re going to be be making lots of shave ice (say for a party or to sell it) this might be an excellent option.
But making your own ice for shaving does have several advantages:
- First, you can make it in exactly the size you need it in. For cube shavers this isn’t really an issue but for block shavers you need to have a block that fits your specific shave ice maker.
- Second, it costs less. Why spend money extra money if you don’t have to?
- Third, you can filter your own water and be totally sure of the quality of the water you’re using to make your shave ice. Since water is the main ingredient of shave ice you’ll want to make sure you’re using the best quality water you can. Unless you make your own ice, there’s really no way to be 100% sure of how clean the water was that was used to make the ice. With convenience store ice, who knows what could be in there.
Planning Ahead
Depending on how much ice you need, the size of the container, and how efficient your freezer is, it may take 24 hours or more to freeze your ice. So this is definitely something you’ll need to plan ahead for. If you’re not the “plan ahead” type, you may be better off with picking up a cube shaver and buying ice from a convenience store.
Next, you’ve got to make sure you have the correct size container to freeze your ice in. For
Purifying & Filtering the Water
Unless you’re lucky enough to live in a municipality with excellent quality water, I highly recommend filtering the water before you freeze it.
If your home already has a water purifier installed (such as a reverse osmosis system) then you should be all set!
Living in South Florida our family drinks a TON of water so we bought a countertop water filtration and purification system. This system isn’t as convenient as a reverse osmosis system, but it does work great and is much more affordable. It saves us money and also means we don’t have to buy bottled drinking water. As a bonus, it makes excellent purified water for making shaved ice.
I would highly recommend using either a reverse osmosis system or a countertop filtration system, as they will purify your water the most and give you the best tasting ice. Other options to filter your tap water include a Brita pitcher or a faucet water filter.
You can also buy purified water, but this is going to cost a lot if you make shaved ice regularly and it’s also not the greenest option environmentally speaking.

Freezing Ice For A Block Ice Shaver
For using a block ice shaver (like this one for example), it’s crucial that you use just the right size container to freeze your ice. Luckily, your ice shaver most likely came with at least one ice mold for this. If it didn’t, you may want to check the instructions or contact the manufacturer to see what size container they recommend using to freeze the ice. Another option is to search amazon for the shave ice maker you have – there’s a good chance that you’ll see the correct size ice molds suggested.
Instructions:
- If your containers are new, make sure you wash them well with dishwashing detergent and rinse them out thoroughly. You don’t want to have any soapy aftertaste lingering in there.
- Next, Filter your water using whichever type of water filter you have available, and fill up your container with water. Your water should always be about 9% away from the top of the container you’re using to freeze your ice in. This is because as the water freezes into ice it will expand by approximately 9%. If you don’t leave extra room, you run the risk of the water spilling over the side of the mold.
- Now put the water-filled containers into the freezer, ideally on the top rack and as close to the back of the freezer as possible. Try to leave space around the sides of the container so that the cool air can circulate around freely and freeze the water as quickly as possible.
- The exact amount of time required to freeze the ice will depend on the size of the containers you’re using, how many you’re using, and how cold your freezer is.
- Try to give yourself at least 12-24 hours for the ice to freeze, or you may find that the inside of your block is still liquid!
- Once the ice is totally frozen solid, skip down to the section on how to temper your ice. It’s crucial that you get it to the proper temperature before you start to use it, or you won’t get the right texture from your shaved ice or snow cones.

Freezing Ice For a Cube Ice Shaver
With cube ice shavers, it’s not usually as crucial to have molds that are an exact size. Most of the time, cube shavers can be used with a range of different sized cubes, so any normal ice cube size should work.
If your refrigerator/freezer has a built in ice cube maker you can absolutely use those ice cubes and make things much easier on yourself. Just make sure the freezer has some kind of water filtration system installed and that the filter has been recently changed. You want to make sure you’re using the highest quality water possible for the shaved ice.
If you’re going to be using ice cube trays, make sure you have enough ice cube trays to make enough ice. Ice cube trays are cheap so it’s a lot easier to buy a couple extra trays now than to have to keep reusing the same one or two trays over and over again.
Instructions:
- If your ice cube containers are new, make sure you wash them thoroughly with dishwashing detergent and rinse them out well. Soap will not make your shave ice taste good.
- Filter your water using whichever type of water filter you have available and fill the ice cube trays about 91% of the way up. Your water is always going to expand by about 9% as it freezes, so it’s important to leave room at the top.
- Place the ice cube trays into the freezer and make sure there is enough room around them for cold air to circulate freely. You can stack the ice cube trays to save room.
- Since ice cubes typically freeze faster than large blocks of ice, your cubed ice should be ready in as little as 4 hours depending on your freezer.
- Remove them from the freezer and let them sit out around 5 or 10 minutes before using them to properly temper them. See below for more info on the ice tempering process.
- Start shaving and enjoy!
Tempering Ice Before Using It
Do not use the ice directly out of a freezer! You first need to “temper’ the ice by letting it warm up slightly. If it’s too cold it’s not going to produce shaved ice of the right texture and can also cause the machine to jam. Likewise, if it’s too warm it’s not going to produce good shave ice.
The perfect temperature for the ice is 20 degrees, and at this stage it will start to “sweat”, meaning it will be wet to the touch.
To get the ice to this temperature, take your ice out of your freezer about 15 minutes before you plan to use it and put it into a cooler as a staging area. Keep a thermometer in the cooler if possible to monitor the temperature.
Read more on tempering ice for shaved ice here.